For week 5 we were tasked to study John Berkey, creating a blockout in Maya that we would then overpaint in Photoshop to produce the final result.
I chose this piece by Berkey because I thought it would be a good challenge to replicate from scratch.
I bashed together the general shape in Maya. I didn't worry too much about detail but rather about the general scale/shape of the ship. I also added a few lights + a sphere for the planet.
I rendered out the scene as a PSD with Alpha's included. From the lighting, I had most of my values that I would need to further build up the shape of the ship.
From there, I started building up the image. I set up my guiding lines and the general scene using some photos of a planet/stars.
Following this, I began to restructure the composition. I used liquefy and warp/transform to correct any faults. I also corrected the colours and began to layer/block shapes.
Once I reached a point where I felt it generally looked okay, I began to start working in finer details.
I added in some of the atmospherics and continued to clean up and layer detail onto the ship.
Here is the final cleaned up version.
Edit 9/27: I went back and polished a little more:
Class edit; Here are the steps if anyone wants to see how I did this:
Thursday, September 27, 2018
Monday, September 24, 2018
Week 5 - Model a Cannon
For week 5 we are modelling a cannon for unreal.
I took the concept into Maya as an image plane and used the UE4 Character as ref for scale.
I followed the concept for the most part.
Here is the final Cannon.
And here it is in Unreal. I had to go back and make some changes to the cannon, since some of the faces weren't showing correctly.
I took the concept into Maya as an image plane and used the UE4 Character as ref for scale.
I followed the concept for the most part.
Here is the final Cannon.
And here it is in Unreal. I had to go back and make some changes to the cannon, since some of the faces weren't showing correctly.
Thursday, September 20, 2018
Week4 - Drew Struzan study
For week 4 we were tasked with studying Drew Struzan.
I chose to study his Bladerunner movie poster.
I believe Struzan used the Iconic composition for this piece. This allowed him to subdivide the space for the various characters while presenting Harrison Ford in a very dignified manner. The focal points all lead towards Ford, with the various characters surrounding him supporting this.
Here is my replica of this poster:
BONUS:
Colored in the sketch I've been working on.
It turned out okay.
Next up: Artstation Feudal Japan contest.
Saturday, September 15, 2018
Week4 - Lego Project continued
I cleaned up my arch from last week with help from Alex and made some more variations.
Here are all the variants:
After creating these, I was tasked with building the wall section. I started by creating a kit in Maya, collecting and altering some pieces. I will be building the entire wall section in Maya. Then grouping all the pieces and exporting as an FBX.
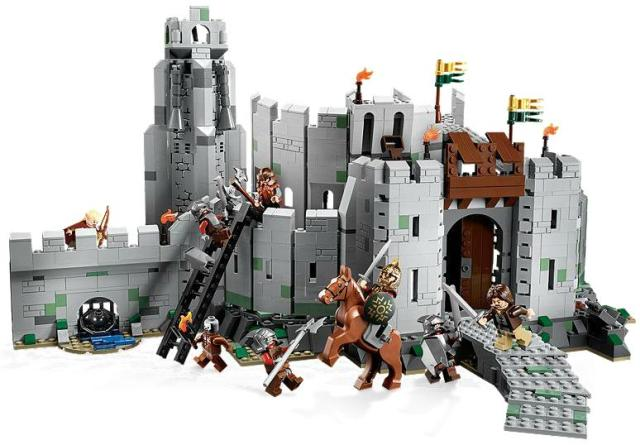
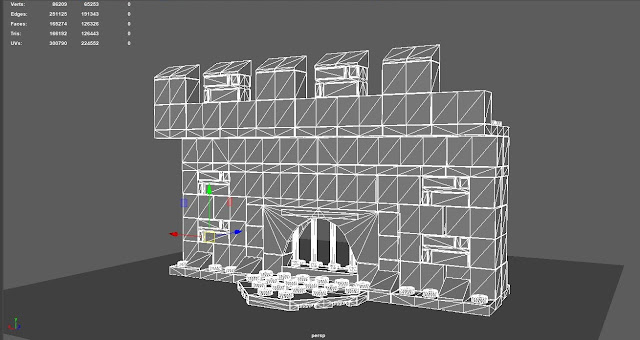
Here is the final wall created in Maya through the kit. It is a 90% accurate replica of the leftmost wall found on this model:
Here it is in Unreal Engine, through the use of a Blueprint (Each piece is still individual but they are grouped as one and as a result can be textured individually in engine). This also allows for resizing should scale change.
Following this, I went back into Maya to clean up the 'scene' a little by removing some polys from pieces that aren't fully visible in the wall (The cylindrical pegs are around 280poly each).
Tris count for the entire scene before clean: 191k
Tris count after: 126k. No visible difference between the two and there is no point in having the Lego brick pegs showing on pieces that are going to be stacked and static.
Because the wall scene is so big, I created a custom LOD for the majority of the wall. This removed around 60k tris.
The only issue is that I would not be able to preserve some of the detail. So I would need to bake the high poly onto the low. But that is something for another day. Another issue is setting up the LOD using blueprints in Unreal.
So the idea is that the LOD would be for the entire scene rather than each individual piece. I have yet to get it to work.
Monday, September 10, 2018
Week 3 - Lego Project (Man-Made)
This week we worked on the Lego project in 3D. I am part of the man-made group and was assigned the wall section of the LOTR Helm's Deep building.
The piece I modeled was an archway that was found on the wall:
I made a High poly and a low poly. I used the Boolean tool to create the curve for high poly (with a cylinder). The Low poly I simply placed edge loops and moved them manually.
I also managed to set up LOD inside of Maya.
Finally, here is the block inside of Unreal.
Sunday, September 9, 2018
Week 3 - Frank Frazetta + Value
This week we were exploring value ranges in class and were tasked with taking some Frank Frazetta lineart and filling in the values (to practice).
Here is my first practice. This image had a lot of potential, I chose to work in color as a result of this potential. I am used to working with value in color, however I made sure to check in B/W every now and then.
From the base linework, I set the background to a mid shade. I then worked in the darker values first (shadows) and separated the different elements. From there, I added some lighter values and made sure to focus on the characters with the lightest values. Color just helped merge the values together and add a little variation here and there.
Second practice resulted in similar outcomes. This time I tried to photobash certain elements of the character with varying degrees of success.
Here is another:
BONUS:
I took one of the silhouettes from last week and developed it a little more. I tried to keep it lose. Perhaps next week I will do a cleaner version with a more refined value range, outlining the elements (clothes etc).
Cleaned character up a bit:
Thursday, September 6, 2018
Week 2 - Silhouettes + Brian Froud
This week we were looking at Silhouettes in class and the design's of Brian Froud!
I am a huge Fantasy buff so this was quite enlightening. I created a moodboard that served as my inspiration for my 'fantasy' themed character sketches. Froud uses a lot of 'wooden' structure in his designs, with strong sharp lines and almost imaginative anatomy.
From these I created some silhouettes that focused primarily on shape/pose and some minor detail. I sort of went with a 'wood' elf/treant look intermixed with female-ish anatomy. I tried to have quite different variations since that would allow me to explore different elements, I also put my own twist on it and exaggerated certain aspects of Froud's design language (that I happened to like).
BONUS:
I really liked the weapons I drew in class so I refined them a little.
I also tried to sort of do a '3D mimic' of one of the design's that I really liked but it didn't turn out as well as I wanted it to. Perhaps something I will return to in the coming week.
Monday, September 3, 2018
Week 2 - Minecraft Block + Scene
This week's assignment was to take our previously created block, UV it and create our own 'minecraft' textures.
I started off by creating the UVs. I had to re-bevel my cube to 4 + I also had to re-UV (My last weeks were a bit of a mess).
I then created the textures I would use in Photoshop. I tried to stay thematic to 'Gold' but did a variety of edits to the original textures.
I then created the master material. I didn't end up using the Sine/offset for the block movement (As I didnt have any water blocks).
Here are the Children from the parents.
And here are the final High-Res screenshots (one low-res too).
Subscribe to:
Posts (Atom)